

I was mid-training on a liquid-cooled desktop GPU that still climbed toward ~80 °C under a long LoRA job, staring at an open 6U steel chassis on the floor: four open-air RTX 3090 cards, two roughly 2 kW power supplies, and almost no case fans. The first question was honest and dumb: how many 120 mm fans do I buy?
That question did not survive contact with the box. What I actually needed was a cold column shared with a spare Gree ducted multi-split head already sitting in the ceiling carton above the rack — and the discipline not to let HVAC CFM blow the chassis inside-out.
This is a builder log for people who already own a rack, a pile of used 3090s, and a duct indoor they have not wired yet. Fans seal the steel. The Gree is a shared cold source. The divider PWM is the balance valve. Stacking only works if the pass-through stays on the cold side.
The box on the floor
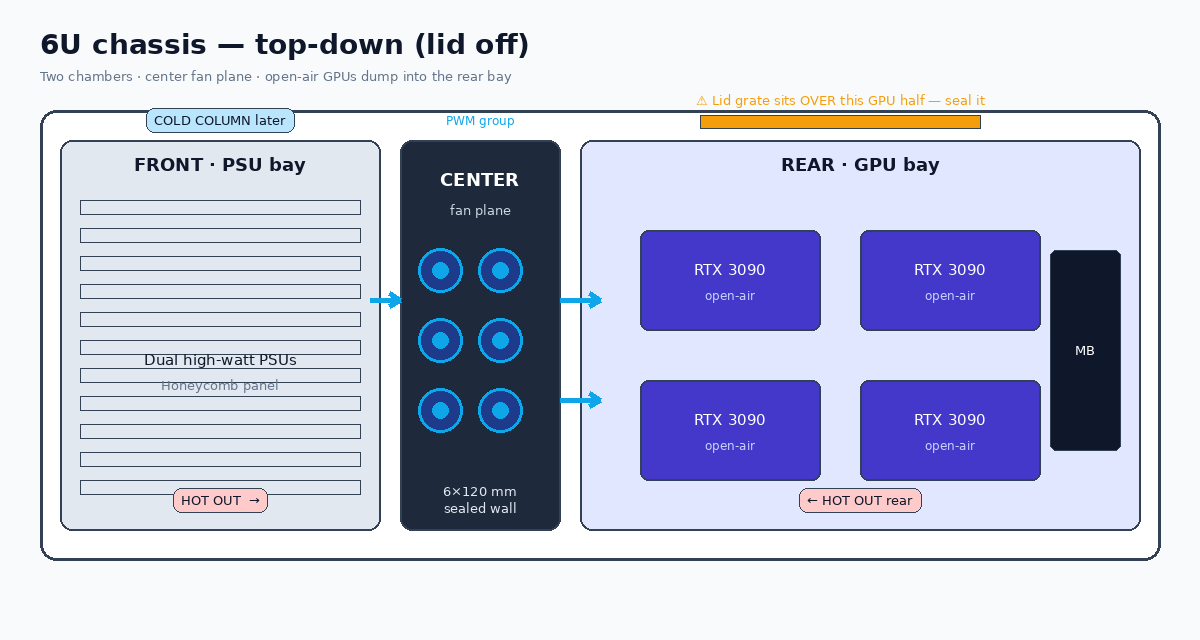
The chassis is a 6U steel multi-GPU frame with two chambers split by a center fan plane:
- Front chamber: dual high-watt PSUs behind a honeycomb panel (room for three 120 mm mounts).
- Rear chamber: four open-air 3090s plus the motherboard.
- Center plane: stock had two lonely 120 mm fans already fitted bottom-right.
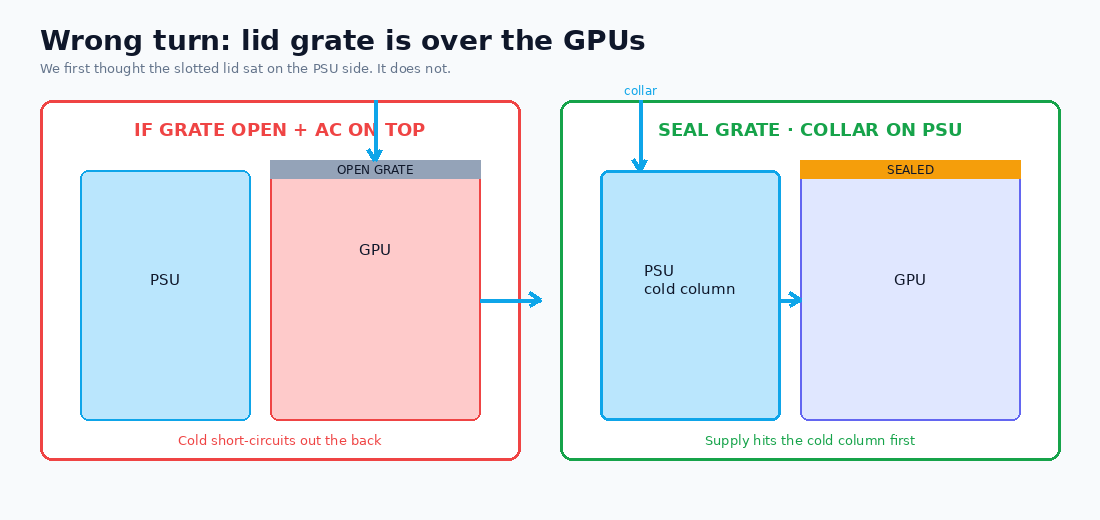
- Lid: a slotted grate. We first assumed it sat over the PSUs. It does not — it sits over the GPU bay. That mistake almost became an AC bypass.
Shopping list for the steel alone, before HVAC: +4 on the center plane (six total as a sealed wall) and +3 on the front honeycomb = seven new fans. One Arctic SATA→PWM adapter so the divider six share a single PWM channel. Empty 120 mm cutouts get sealed — a hole without a fan is a leak, not a free lunch.
Airflow rules we actually settled on
- Do not let PSU exhaust and GPU exhaust dump on each other.
- PSU fans exhaust out the front. The three front 120s also blow out.
- 3090 / GPU chamber exhaust out the back.
- The center six are the valve between bays. PWM them as a group to balance “feed the PSUs” vs “feed the cards.”
- Open-air 3090s dump heat into the case volume. They are not blower cards. If you dump supply air onto the lid grate over the GPU bay, cold air short-circuits out the back and never hits the intakes.
That last point is why sealing the GPU lid grate is not optional aesthetics. It is thermodynamics with duct tape.
Wrong turn: front intake forever
Gaming-case muscle memory says “cold in the front, hot out the back.” With dual high-watt PSUs that already exhaust forward through the honeycomb, front intake means you are fighting the PSUs and mixing two plumes in the same hole. Once the front three are locked as exhaust, the only sane cold entry is somewhere else — a collar into the PSU bay, as far from the honeycomb as the steel allows.
Wrong turn: the lid grate is over the GPUs
We walked around the chassis convinced the slotted lid sat on the power side. It does not. The grate is over the open-air cards. Leave it open under a ceiling supply drop and you build a chimney: AC in the top, straight out the rear, GPUs still cooking in recirculated aisle air. Tape or panel that grate before you commission the duct.
The Gree above the rack
An unused Gree duct-type indoor carton lives in the ceiling void above the rack — box dims about 150.5 × 55.5 × 26.0 cm. It will hang on a multi-split outdoor, so capacity is shared with other heads. That single sentence is most of the political economy of this design: you do not own the outdoor compressor alone.
- Supply flange → insulated pipe into the rack.
- Return: not on top of the supply drop. A ceiling mesh beside the rack is acceptable; better for the room is a rectangular return on the opposite side so the hot plume has to walk the ceiling instead of short-cycling the coil.
- Do not dump chassis exhaust into the Gree supply.
- Do not use an old rack-roof fan hole as a chimney into the coil supply.
Thermostat trap: duct heads often sense return air. A hot rack plume at the return makes the Gree think the room is an oven. It overcools and hogs the multi-split while the far bedrooms go soft. Use the wired wall controller (room sensor) mid-height on the cool side of the room — not on the ceiling path next to the rack.
How cold air enters the steel
Cut a collar into the PSU compartment of the top 6U — side or lid, as far from the front honeycomb as you can. That is the AC inlet. Insulate the hose. Treat raw cut metal (edges, rust, condensation). Condensation is not theoretical once you are below dew point on Thai wet-season nights.
Gree duct CFM is not a PC fan curve. A duct head often moves on the order of 600–1200 CFM. Six 120 mm fans through a chassis might swallow something like 200–350 CFM if you are lucky and sealed. Pipe 100% of supply into the box and the PSU bay goes positive: cold air blows back out the front honeycomb while the GPUs still starve. You did not cool a computer. You built a loud diffuser with four expensive resistors in the back.
The T-junction (non-negotiable)
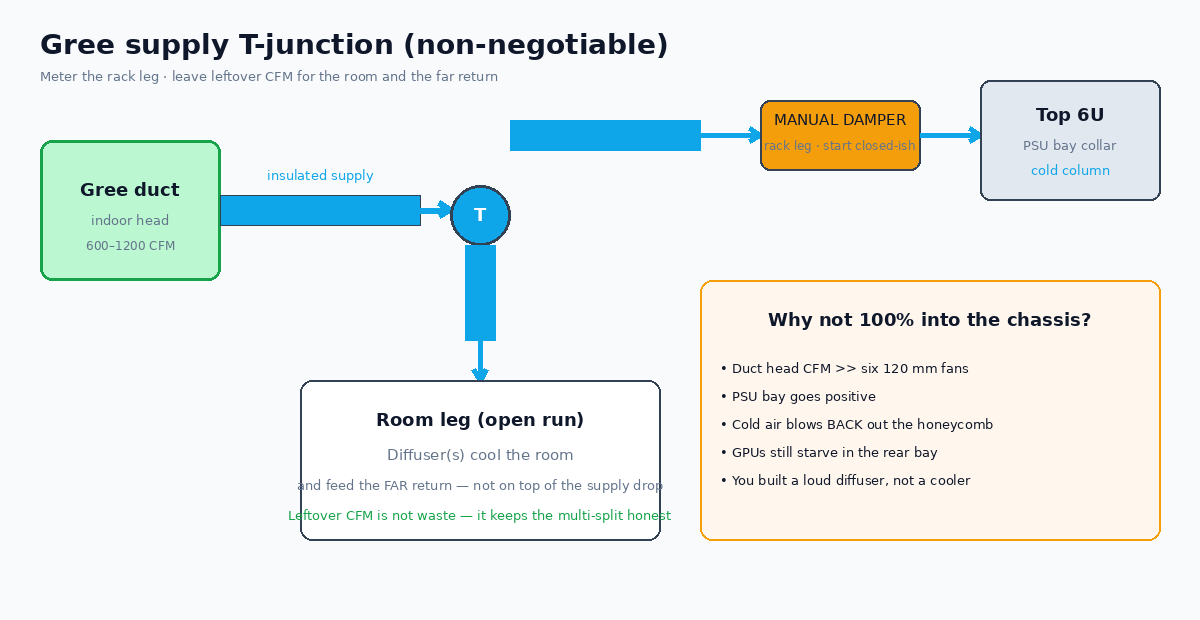
The rack leg needs a damper. Start manual. A powered damper can wait until a second quad box makes load unpredictable — then drive it from GPU temperature, not from the Gree’s lying return sensor.
Inside each 6U after the collar is live:
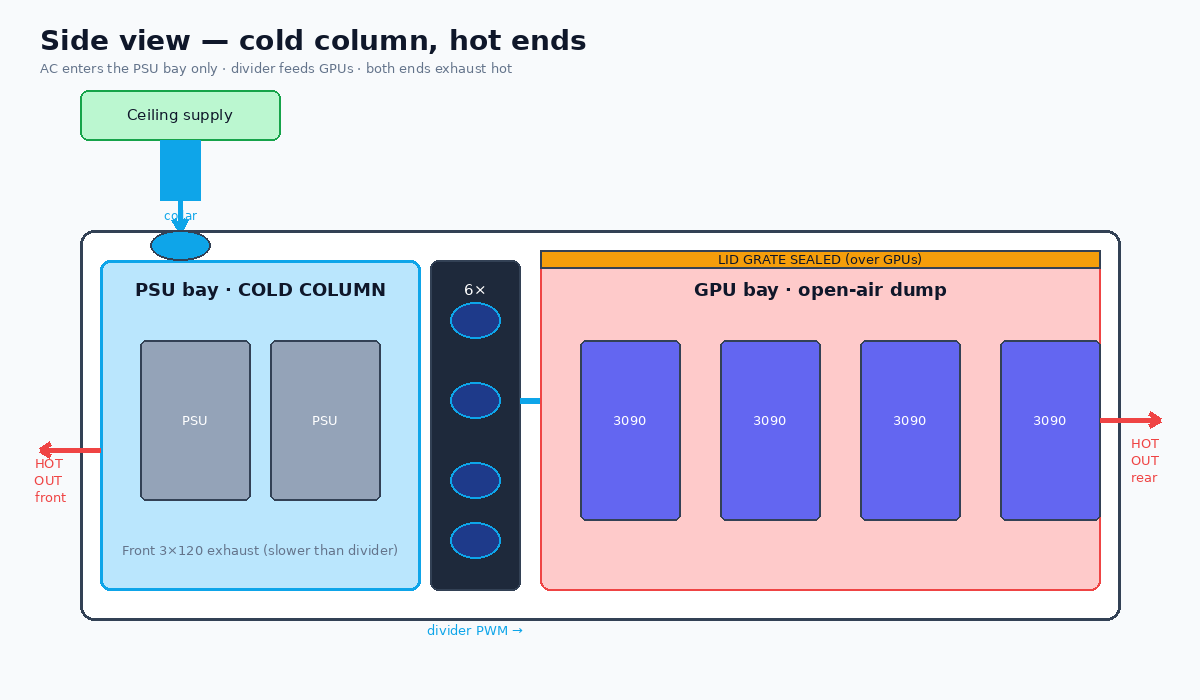
- The cold column lives only in the PSU bays.
- Divider fans blow PSU bay → GPU bay so leftover supply air hits the 3090 intakes.
- Front fans stay exhaust, and run slower than the divider so they do not win the fight and dump AC out the honeycomb.
- GPU rear stays exhaust.
Target under train: mid-70s to low-80s °C core, VRAM junction under ~95 °C. Power-limit used 3090s to ~250–300 W if heat or noise is the boss. Pads may still be due regardless of how pretty your fan wall looks — open-air 3090s are not immortal.
Stacking more 6Us: daisy-chain cold only
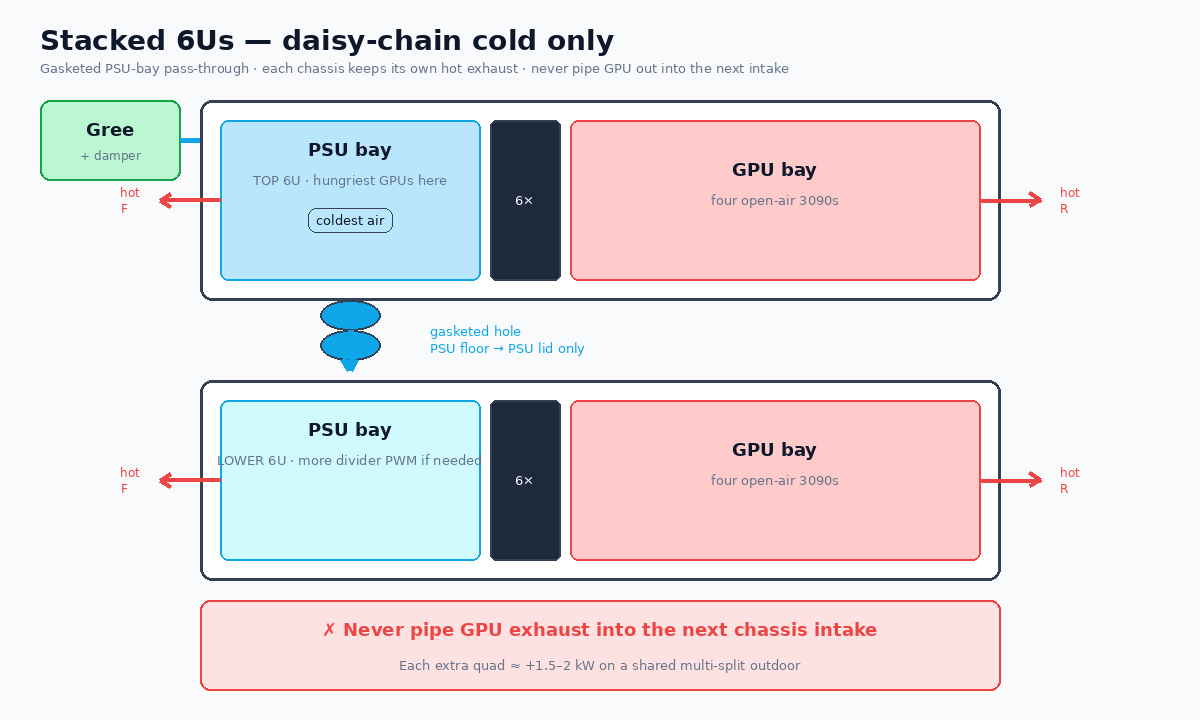
Second chassis does not get its own heroic supply drop on day one. Cut a hole in the PSU-bay floor of the upper box lined up with a hole in the PSU-bay lid/bottom of the one below. Gasket the joint. AC into the top box walks down the stack as a cold column.
- Each chassis still throws its own heat out front and back into the rack aisle.
- Never pipe GPU exhaust into the next intake.
- Top box gets the coldest air — put the hungriest GPUs on top, or give lower boxes more divider PWM.
- Each extra quad is another roughly 1.5–2 kW of heat on a shared multi-split outdoor. Fans do not invent compressor tons.
Rack placement
- Park the 6U high enough that you can work the collar and still read labels.
- Blank unused U so plumes do not loop into a grate.
- Flaps or backdraft dampers only on exhaust openings (front honeycomb, maybe rear) — never on the cold inlet.
- A short baffle so front exhaust cannot rise into a lid intake matters less once the GPU grate is sealed and supply is a proper collar, but it is still cheap insurance.
What I would buy first vs later
Now: seven 120 mm fans, one PWM hub/adapter for the divider six, sealing materials, insulated duct, a manual damper on the rack leg of the T, wall controller placement thought through before the first train job.
Later: powered damper on GPU temp, second collar when the next chassis is real metal, maybe a proper return on the far wall if the ceiling mesh next to the rack still short-cycles.
I would not buy a twelfth case fan to “fix” a missing T-junction.
Commissioning checklist
- GPU lid grate sealed.
- Front honeycomb: hot out, not cold AC whistling out.
- Rear of GPU bay: hot out.
- Collar: cold in.
- Divider PWM start ~40–50%. Raise until GPU temps flatten. Back off if a PSU runs hotter than you like.
- Wall stat runs the Gree — not the ceiling return next to the rack plume.
- After 20–30 minutes of real train: read cores and VRAM, not only “the room feels fine.”
- Hand test: hold a tissue at the front honeycomb and at the collar. If the tissue flaps the wrong way, fix the damper before you celebrate CFM.
What “working” feels like
Working is boring. The aisle is warm at the back of the GPU bay and at the front honeycomb. The PSU bay smells like cold plastic, not ozone. The Gree does not slam full blast every time a coding agent starts a long session. Divider PWM is a knob you touch twice a season, not a religion.
Not working is also obvious: cold air pouring out the front while the 3090s sit in the mid-90s, or a multi-split outdoor locked on the rack zone while the rest of the house argues with the wall remote.
Why this is infrastructure, not RGB
At 3DN we talk about compute, multi-GPU work, and the quiet cost of running agents and local models next to the rest of the family stack — managed hosting, digital sovereignty preferences, even the fintech spine behind brands like DutchBud bank and virtual credits (dibs) on sibling sites. None of that marketing survives a rack that cooks itself. Heat is part of the bill of materials.
So no: the answer was not “just add more fans.” Fans turn the 6U into a duct segment. The Gree is a shared cold source that will overpower the box unless you T and damper it. The divider PWM balances the two chambers. Stacking only works if the pass-through stays on the cold side and every chassis still owns its own hot exhaust.
I still need more fans than the empty steel came with. I also need a damper, a sealed grate, and the humility to leave leftover CFM for the room.

Leave a Reply